Blog

  • Eco-Friendly Junk Removal: Smarter Ways to Declutter Responsibly

    Eco-Friendly Junk Removal: Smarter Ways to Declutter Responsibly

    Getting rid of unwanted items is often viewed as a simple cleanup task, but the way junk is handled can have a significant impact on the environment. From old furniture and broken appliances to renovation debris and household clutter, millions of tons of waste end up in landfills each year. As sustainability becomes a growing priority for homeowners and businesses alike, many people are looking for better ways to dispose of unwanted items without contributing to unnecessary waste.

    This is where eco-friendly junk removal makes a difference. Companies such as Junk Rescue AZ help property owners clear unwanted items while prioritizing responsible disposal methods that reduce landfill waste and support environmental sustainability. By focusing on recycling, donation, reuse, and proper waste management, eco-conscious junk removal provides a practical solution for anyone looking to declutter while minimizing their environmental footprint.

    What Is Eco-Friendly Junk Removal?

    Eco-friendly junk removal is the process of collecting, sorting, and disposing of unwanted items in ways that reduce environmental harm. Rather than sending everything directly to a landfill, items are evaluated for opportunities to be reused, recycled, donated, or repurposed.

    The goal is simple: keep as much material as possible out of landfills while ensuring that waste is handled responsibly.

    This approach applies to a wide range of materials, including:

    • Furniture
    • Electronics
    • Yard waste
    • Metal scrap
    • Appliances
    • Construction debris
    • Cardboard and paper products
    • Household goods

    By extending the life cycle of usable items and recovering recyclable materials, eco-friendly disposal practices help conserve resources and reduce pollution.

    Why Traditional Junk Disposal Creates Environmental Challenges

    Many people assume that once an item is removed from their property, the problem is solved. However, improper disposal can create long-term environmental issues.

    Landfills continue to grow as communities generate increasing amounts of waste. When recyclable materials are buried instead of recovered, valuable resources are lost. Certain items, such as electronics and appliances, may also contain components that require specialized handling to prevent environmental contamination.

    Some common concerns associated with traditional disposal include:

    • Increased landfill overcrowding
    • Wasted recyclable materials
    • Higher greenhouse gas emissions
    • Resource depletion
    • Improper handling of hazardous components

    Choosing responsible junk removal services helps address these challenges by diverting materials away from landfills whenever possible.

    The Environmental Benefits of Eco-Friendly Junk Removal

    Reduces Landfill Waste

    One of the biggest advantages of eco-friendly junk removal is landfill diversion.

    Many discarded items still contain recyclable materials or usable components. When these materials are separated and processed correctly, fewer resources end up buried in landfills.

    Reducing landfill waste helps preserve valuable land, lowers environmental strain, and supports more sustainable waste management systems.

    Supports Recycling Efforts

    Recycling plays a major role in environmental conservation.

    Materials such as metal, cardboard, paper, plastic, and certain electronics can often be processed and transformed into new products. This reduces the need for extracting raw materials and decreases energy consumption during manufacturing.

    When junk removal providers prioritize recycling, they help create a circular economy where materials remain in use longer.

    Encourages Reuse and Donation

    Many unwanted items are still functional.

    Furniture, clothing, household goods, and office equipment can often be donated to charities, community organizations, or individuals in need. Extending the life of these products reduces waste while benefiting local communities.

    Donation programs also help families and organizations access essential items at lower costs.

    Conserves Natural Resources

    Manufacturing new products requires significant amounts of raw materials, water, and energy.

    By recycling and reusing existing materials, fewer natural resources are needed to produce replacement products. This contributes to long-term resource conservation and helps reduce environmental degradation associated with extraction activities.

    Reduces Carbon Emissions

    Producing products from recycled materials often requires less energy than manufacturing them from virgin resources.

    As a result, responsible waste management can help reduce greenhouse gas emissions associated with production, transportation, and disposal processes.

    Over time, these reductions contribute to broader environmental sustainability goals.

    Items Commonly Recycled During Junk Removal

    Many people are surprised by how many materials can potentially be recycled.

    Common recyclable items include:

    Metals

    Metal recycling is one of the most efficient forms of resource recovery.

    Examples include:

    • Steel furniture
    • Aluminum products
    • Copper wiring
    • Metal shelving
    • Scrap metal from renovations

    These materials can often be melted down and reused repeatedly without significant quality loss.

    Electronics

    Electronic waste continues to be one of the fastest-growing waste streams worldwide.

    Items frequently recycled include:

    • Computers
    • Printers
    • Televisions
    • Monitors
    • Small electronics

    Proper recycling helps recover valuable materials while ensuring sensitive components are handled responsibly.

    Appliances

    Many appliances contain recyclable metal, plastic, and electronic components.

    Examples include:

    • Refrigerators
    • Washing machines
    • Dryers
    • Dishwashers
    • Microwaves

    Specialized processing helps maximize material recovery while complying with environmental regulations.

    Cardboard and Paper

    Packaging materials and paper products are commonly generated during moves, renovations, and business cleanouts.

    Recycling these materials helps reduce demand for new paper production and supports sustainable forestry practices.

    How Homeowners Can Support Sustainable Junk Removal

    While professional services play an important role, homeowners can also contribute to responsible waste management.

    Sort Items Before Pickup

    Separating recyclable materials from general waste can streamline the disposal process.

    Creating designated piles for donations, recycling, and disposal helps improve efficiency and increases diversion rates.

    Donate Usable Items

    Before scheduling removal, consider whether certain items can still serve a purpose.

    Local charities, schools, shelters, and nonprofit organizations often accept:

    • Furniture
    • Clothing
    • Toys
    • Household goods
    • Office equipment

    Donation extends product life while reducing waste.

    Avoid Illegal Dumping

    Improper disposal may seem convenient, but it creates environmental and community problems.

    Illegal dumping can contaminate natural areas, harm wildlife, and result in costly cleanup efforts. Responsible disposal protects both local ecosystems and neighborhoods.

    Choose Companies with Sustainable Practices

    Not all junk removal services operate the same way.

    When evaluating providers, ask questions such as:

    1. Do they prioritize recycling?
    2. Do they donate usable items?
    3. Do they work with recycling facilities?
    4. Do they provide responsible disposal solutions?
    5. Do they have experience handling specialty waste?

    A commitment to sustainability demonstrates a company’s dedication to environmental responsibility.

    Eco-Friendly Junk Removal for Businesses

    Businesses also generate significant amounts of waste through daily operations, renovations, relocations, and equipment upgrades.

    Responsible junk removal can help organizations:

    • Improve sustainability initiatives
    • Reduce landfill contributions
    • Support environmental goals
    • Enhance brand reputation
    • Maintain cleaner workspaces

    Office furniture, electronics, packaging materials, and outdated equipment often contain valuable recyclable components that should be recovered whenever possible.

    Many companies now include sustainable waste management as part of their broader environmental, social, and governance objectives, making responsible junk removal an increasingly important business practice.

    The Future of Sustainable Waste Management

    Consumer expectations continue to evolve as environmental awareness grows.

    People are becoming more conscious of how products are manufactured, used, and ultimately disposed of. This shift is encouraging greater investment in recycling infrastructure, material recovery programs, and sustainable waste management solutions.

    Future trends may include:

    • Advanced sorting technologies
    • Increased recycling capabilities
    • Expanded donation partnerships
    • Greater landfill diversion targets
    • Improved circular economy initiatives

    As these innovations continue to develop, eco-friendly junk removal will play an increasingly important role in reducing waste and preserving valuable resources.

    Final Thoughts

    Choosing eco-friendly junk removal is about more than simply clearing clutter. It is an opportunity to reduce landfill waste, conserve natural resources, support recycling efforts, and give reusable items a second life. Whether you’re cleaning out a home, managing a renovation project, or upgrading business equipment, responsible disposal practices can make a meaningful environmental impact.

    By working with environmentally conscious providers such as Junk Rescue AZ and making thoughtful disposal decisions, individuals and businesses can contribute to cleaner communities and a more sustainable future while ensuring unwanted items are handled responsibly every step of the way.
  • Open Concept vs Closed Floor Plan Design

    Open Concept vs Closed Floor Plan Design

    The open concept trend dominated home design for over a decade, but lately more homeowners are questioning whether knocking down every wall was actually the right call. Having watched a few friends go through this debate while renovating, I’ve noticed there’s genuinely no universal right answer here.

    Let’s break down open concept vs closed floor plan design honestly, including where each one falls short.

    Which Layout Is Actually Better?

    Quick answer: Neither open concept nor closed floor plan design is universally better — open layouts suit socially-oriented households prioritising natural light and connection, while closed layouts suit households needing more privacy, noise control, and defined functional zones, particularly with kids or frequent remote work.

    1. Natural Light and Spaciousness

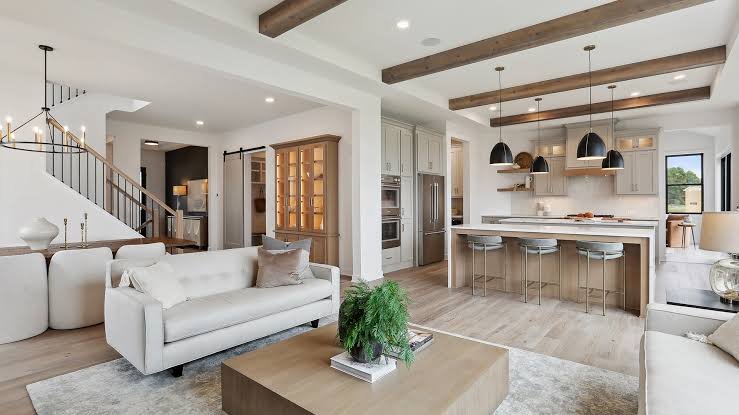
    Open concept layouts undeniably let natural light travel further through a home, and they make smaller homes feel noticeably larger by removing visual barriers between spaces.

    2. Noise and Privacy Trade-Offs

    Quick answer: Open concept layouts spread noise throughout the connected space, making it harder to have a quiet conversation, watch TV, or take a work call without disturbing others — a genuine drawback for households with mixed schedules or young children.

    Picture a household with one person working from home and another watching TV — in an open layout, that’s a real daily friction point that closed layouts simply avoid.

    3. Cooking Odours and Kitchen Mess Visibility

    Open kitchens mean cooking smells and visible mess spread into living areas immediately. Closed kitchen layouts contain both far better, which matters more for households that cook elaborate meals regularly.

    4. Furniture and Zone Definition Challenges

    Open layouts require more intentional furniture arrangement and rugs to define separate zones — dining, living, kitchen — since there are no walls doing that job naturally. This isn’t necessarily a downside, but it does take more design effort to get right.

    5. Renovation and Structural Costs

    Converting a closed floor plan to open concept involves removing walls, which can be costly and complicated if those walls are load-bearing, often requiring structural reinforcement like beams.

    6. Closed Floor Plans and Defined Functionality

    Separate rooms allow for more specialised design in each space — a home office that’s genuinely quiet and separate, a kitchen that contains mess, a living room that stays formal and presentable.

    7. Hybrid Approach — The Middle Ground

    Quick answer: A hybrid layout — combining an open kitchen-dining area with a separate, closable living room or study — is increasingly popular in 2026, offering flexibility between open connection and closed privacy depending on the household’s specific needs.

    Many homeowners going through renovation in 2026 are landing somewhere in between rather than committing fully to either extreme, and honestly, that seems like the more practical approach for most real households.

    8. Resale Considerations

    Open concept layouts have generally been favoured by buyers over the past decade, though there’s a noticeable shift in some markets toward appreciating defined spaces again, particularly among buyers prioritising work-from-home functionality.

    A Simple Decision Framework

    1. Households prioritising social connection and natural light — open concept
    2. Households needing noise control, defined work zones, or privacy — closed floor plan
    3. Households wanting flexibility — hybrid layout with selective openness

    FAQs

    Q: Is open concept design still popular in 2026? Yes, though its dominance has softened somewhat as more homeowners recognise the noise and privacy trade-offs, leading to increased interest in hybrid layouts.

    Q: Does removing walls for an open concept always increase home value? Not always — it depends on the local market and buyer preferences, which have shifted somewhat toward valuing defined spaces again in some regions.

    Q: What’s a hybrid floor plan? A layout combining open connected areas, like kitchen and dining, with separate closable rooms for privacy-dependent functions like offices or bedrooms.

    Q: Is it expensive to convert a closed floor plan to open concept? It can be, particularly if load-bearing walls are involved, requiring structural reinforcement that adds significantly to renovation cost.

    Q: Which floor plan is better for households with young children? Closed or hybrid layouts often work better, offering separate quiet zones away from shared living noise, though open layouts do allow easier supervision.

    Conclusion

    The open concept vs closed floor plan decision really depends on how your household actually lives day to day, not just which look feels more current. Consider noise tolerance, privacy needs, and cooking habits honestly before committing to either extreme — or consider a hybrid approach that gives you flexibility on both fronts. [link to related guide on modern home design trends here]

    Alt text suggestions:

    1. “Open concept kitchen and living area with natural light flow”
    2. “Closed floor plan with defined separate rooms and doorways”
    3. “Hybrid home layout combining open dining with closable study room”
  • Modern Home Design Trends for 2026

    Modern Home Design Trends for 2026

    Design trends move fast, and honestly, not all of them are worth chasing. But a few genuinely useful shifts are showing up across homes this year — not just aesthetic fads, but changes that reflect how people actually want to live now.

    Here’s an honest look at the modern home design trends that seem to have real staying power in 2026, not just Instagram appeal.

    What’s Actually Driving 2026 Design Trends?

    Quick answer: Modern home design trends in 2026 are largely driven by a shift toward functional, multi-purpose spaces and natural materials, reflecting continued hybrid work patterns and a growing preference for sustainable, low-maintenance choices over purely decorative trends.

    1. Warm Minimalism Over Stark Minimalism

    Pure white, stark minimalist interiors are softening into what’s being called “warm minimalism” — the same clean-lined approach, but with wood tones, warmer neutrals, and textured fabrics replacing the coldness of earlier minimalist trends.

    2. Multi-Functional Rooms

    With hybrid work continuing to shape home life, rooms that serve double duty — a guest room that’s also a home office, a dining area that converts to workspace — are increasingly common in both new builds and renovations.

    3. Natural and Textured Materials

    Rattan, exposed wood grain, and natural stone finishes are replacing some of the sleek, glossy surfaces that dominated the last several years. There’s a genuine shift toward materials that show some texture and imperfection.

    Quick answer: Natural materials like rattan, wood, and textured stone are trending in 2026 partly because they age visibly better than glossy synthetic finishes, which show wear more obviously over time.

    4. Curved Furniture and Architectural Lines

    Sharp, angular furniture is giving way to softer, curved silhouettes — rounded sofas, arched doorways, curved kitchen islands. It’s a noticeable shift from the very geometric look that dominated recent years.

    5. Biophilic Design Elements

    Bringing nature indoors more deliberately — larger windows, indoor plant walls, natural light optimisation — continues gaining traction as people prioritise wellbeing-focused design over purely aesthetic choices.

    6. Statement Ceilings

    Ceilings are getting more design attention than they have in years — exposed beams, textured paint, even bold colour, treating the “fifth wall” as an intentional design element rather than an afterthought.

    7. Sustainable and Low-Maintenance Choices

    Homeowners are increasingly prioritising materials and finishes that require less upkeep and have a smaller environmental footprint — reflected in growing interest in engineered materials, water-efficient fixtures, and durable natural finishes.

    8. Bold Kitchen Cabinetry Colors

    Plain white kitchens are giving some ground to deeper, richer cabinet colours — sage green, navy, terracotta — paired with lighter countertops for contrast, rather than the all-white kitchen that dominated for years.

    Trends That Seem to Be Fading

    1. All-white, stark minimalist interiors without warmth
    2. Overly glossy, high-shine surfaces throughout a home
    3. Purely geometric, sharp-angled furniture without softer elements

    Applying These Trends Without Overspending

    You don’t need a full renovation to incorporate current design trends. Swapping cabinet hardware, adding textured throws and rugs, or repainting a statement ceiling can bring a home noticeably up to date without a major budget commitment.

    FAQs

    Q: What is warm minimalism and how is it different from regular minimalism? Warm minimalism keeps minimalist principles of restraint and clean lines but incorporates warmer tones and natural textures instead of stark white and cold surfaces.

    Q: Are multi-functional rooms a lasting design trend or temporary? Given continued hybrid work patterns, multi-functional spaces appear to have genuine staying power rather than being a passing trend.

    Q: What kitchen cabinet colors are trending in 2026? Deeper, richer tones like sage green, navy, and terracotta are gaining popularity over the traditional all-white kitchen look.

    Q: Is biophilic design just about adding more plants? It includes plants but also encompasses natural light optimisation, natural materials, and design that generally connects indoor spaces with nature.

    Q: Do I need to renovate fully to update my home with current design trends? No, smaller changes like hardware, textiles, and paint can meaningfully update a home’s look without a full renovation.

    Conclusion

    The strongest modern home design trends in 2026 point toward warmth, function, and natural materials over purely decorative statements. Whether you’re renovating fully or just refreshing a few elements, focusing on textures, multi-purpose spaces, and softer lines will keep your home feeling current without chasing every passing trend. [link to related guide on open concept floor plan design here]

    Alt text suggestions:

    1. “Warm minimalist living room with natural wood tones and textured fabric”
    2. “Curved sofa and rounded furniture in a modern living space”
    3. “Statement textured ceiling design in a contemporary home”
  • How to Style a Minimalist Living Room

    How to Style a Minimalist Living Room

    Minimalism gets misunderstood a lot. People assume it just means an empty room with one white sofa, but genuinely good minimalist design is about intention, not deprivation. Every piece in the room earns its place rather than just filling space.

    Learning to style minimalist living room ideas properly takes a bit of restraint, honestly — the hardest part is usually deciding what to leave out, not what to add.

    What Actually Defines a Minimalist Living Room?

    Quick answer: A minimalist living room is defined by a limited, cohesive color palette, purposeful furniture with no excess, and visible negative space — not simply having fewer items, but ensuring every item present serves a clear function or purpose.

    1. Start With a Restrained Color Palette

    Stick to two or three colours maximum across the entire room — typically a neutral base (white, beige, warm grey) with one or two accent tones. This restraint is what gives minimalist spaces their calm, cohesive feel.

    2. Choose Furniture With Clean Lines

    Avoid overly ornate or heavily carved furniture pieces. Simple, clean-lined sofas and tables let the room breathe visually, rather than competing for attention.

    3. Embrace Negative Space Intentionally

    Quick answer: Leaving deliberate empty space around furniture — rather than filling every corner — is core to minimalist design, since it creates visual breathing room that makes the entire room feel calmer and more spacious.

    This feels counterintuitive at first, especially if you’re used to filling rooms fully. But empty space, used well, is doing real design work.

    4. Limit Decor to a Few Meaningful Pieces

    Rather than scattering multiple small decor items, choose one or two larger, meaningful pieces — a well-chosen piece of art, a single striking vase — that genuinely deserve attention rather than competing with clutter.

    5. Hidden Storage Is Essential

    Minimalist rooms only look effortless because clutter is stored out of sight. Invest in furniture with built-in storage — ottomans, media consoles with closed cabinets — to keep everyday items tucked away.

    6. Texture Adds Warmth Without Clutter

    Since colour is limited, texture becomes an important tool — a wool throw, a textured rug, natural wood grain — these add visual interest and warmth without breaking the minimalist colour discipline.

    7. Lighting Should Be Simple but Intentional

    Avoid multiple competing light sources. One or two well-placed fixtures — a floor lamp with clean lines, simple pendant lighting — support the room’s calm aesthetic better than scattered decorative lighting.

    8. Curate, Don’t Eliminate, Personal Items

    Quick answer: Minimalist living rooms don’t require removing all personal items — displaying a carefully chosen few, rather than many scattered mementos, keeps the space feeling personal while maintaining the intentional, uncluttered aesthetic.

    A Simple Minimalist Styling Checklist

    1. Choose a two-to-three colour palette and stick to it strictly
    2. Select furniture with clean, simple lines
    3. Leave visible negative space around key pieces
    4. Store everyday clutter in closed storage furniture
    5. Add texture through fabric and natural materials, not extra objects

    Common Mistakes When Attempting Minimalism

    • Making the room feel cold or empty rather than calm — usually from skipping texture entirely
    • Over-restricting furniture to the point of impracticality
    • Choosing trendy “minimalist” decor items that actually clutter the space

    FAQs

    Q: Does minimalist decorating mean having very little furniture? Not necessarily — it means having only furniture that serves a clear purpose, arranged with intentional space around it.

    Q: How do I make a minimalist living room feel warm, not cold? Incorporate natural textures like wood, wool, and linen, and warm lighting, rather than relying purely on stark white or grey tones.

    Q: What colors work best for a minimalist living room? Neutral bases like white, beige, or warm grey with one or two accent colours generally work best for a cohesive minimalist look.

    Q: Can I display personal items in a minimalist living room? Yes, curated display of a few meaningful items keeps the space personal without disrupting the clean, intentional aesthetic.

    Q: Is minimalist styling more affordable than traditional decorating? Often yes, since it prioritises fewer, better-quality pieces over accumulating many decorative items over time.

    Conclusion

    Styling minimalist living room ideas well is about intention, not emptiness. Choose a restrained palette, clean-lined furniture, and let negative space do some of the visual work. Add texture and a few meaningful personal pieces, and the result feels calm and put-together rather than sparse or unfinished. [link to related guide on budget home decorating ideas here]

    Alt text suggestions:

    1. “Minimalist living room with neutral palette and clean-lined furniture”
    2. “Textured throw and rug adding warmth to minimalist decor”
    3. “Curated single art piece in a minimalist styled living space”
  • Budget Home Decorating Ideas for Rentals

    Budget Home Decorating Ideas for Rentals

    Rental apartments come with a specific kind of decorating challenge — you want the place to feel like yours, but you can’t drill holes everywhere or repaint without asking permission first. I’ve lived in enough rentals to know this constraint actually pushes you toward more creative solutions.

    These budget home decorating ideas are built specifically around what works in rented spaces, without upsetting your landlord or your bank balance.

    Can You Really Decorate Well Without Permanent Changes?

    Quick answer: Yes — removable wallpaper, command hooks, rugs, and strategic lighting can transform a rental’s look completely without any permanent changes, typically costing ₹8,000-₹15,000 for a full room refresh.

    1. Removable Wallpaper for Accent Walls

    Peel-and-stick wallpaper has genuinely improved a lot in quality over the last couple of years. It applies cleanly, removes without damaging paint, and instantly adds personality to an otherwise plain rental wall.

    2. Command Hooks and Strips Instead of Nails

    For hanging art, mirrors, or light shelving, command strips hold surprisingly well for their weight rating and come off cleanly without wall damage — genuinely a rental decorator’s best friend.

    3. Rugs to Define and Warm Up Spaces

    A good rug does double duty — it covers unremarkable rental flooring and visually defines separate zones in an open layout. Layering a smaller patterned rug over a larger neutral one adds texture without much cost.

    4. Curtains Instead of Relying on Landlord Blinds

    Swapping out standard rental blinds for your own curtains (keeping the originals stored for move-out) instantly softens a space and adds colour. Tension rods make this fully reversible.

    5. Strategic Lighting Changes

    Quick answer: Swapping harsh overhead lighting for warm-toned lamps and string lights is one of the most affordable budget home decorating ideas, typically costing under ₹3,000, and dramatically changes a room’s mood without any electrical work.

    6. Plants for Instant Life and Color

    Plants add genuine warmth to a space and, practically speaking, cost far less than most decor items relative to the visual impact they create. Low-maintenance options like pothos or snake plants work well for renters who travel often.

    7. Gallery Walls With Removable Adhesive

    Group framed prints or photos using adhesive strips for a personalised gallery wall. This is a favourite trick because it makes even a small rental feel curated rather than generic.

    8. Furniture Layout Over New Furniture

    Before buying anything new, try rearranging existing furniture. A different layout can make a rental feel entirely fresh, and it costs absolutely nothing beyond a bit of effort.

    A Sample ₹10000 Rental Decorating Plan

    1. Peel-and-stick wallpaper accent wall — ₹3,500
    2. New curtains on tension rods — ₹2,500
    3. String lights and a warm lamp — ₹1,500
    4. Two plants with pots — ₹1,500
    5. Command strips for wall art — ₹1,000

    What to Always Check With Your Landlord First

    • Whether removable wallpaper is genuinely allowed on the lease terms
    • Weight limits if any specified for command strips or hooks
    • Any restrictions on visible exterior changes like balcony decor

    FAQs

    Q: Does peel-and-stick wallpaper damage rental walls? Good quality removable wallpaper, applied and removed correctly, generally doesn’t damage paint underneath, though it’s worth testing a small patch first.

    Q: Can command hooks hold heavy mirrors or shelves? Larger command strips can hold surprising weight, but always check the manufacturer’s weight rating before hanging anything heavy.

    Q: What’s the cheapest way to add personality to a rental? Lighting changes and plants offer the best visual impact for the lowest cost, often under ₹3,000-₹5,000 combined.

    Q: Should I ask my landlord before any decorating changes? For anything beyond fully removable items, yes — it’s worth a quick check to avoid deposit disputes at move-out.

    Q: Can rugs really change how a small rental looks? Yes, significantly — they cover unremarkable flooring and visually define spaces, especially in studio or open-layout rentals.

    Conclusion

    Decorating a rental well isn’t about spending more — it’s about picking changes that are fully reversible but still make a genuine visual impact. With the right budget home decorating ideas, a rented space can feel just as personal and put-together as one you own outright. [link to related guide on minimalist living room ideas here]

    Alt text suggestions:

    1. “Peel-and-stick wallpaper accent wall in a rental apartment”
    2. “Command strip gallery wall with framed art in rented space”
    3. “String lights and warm lamp lighting in a cozy rental bedroom”
  • Interior Painting Mistakes to Avoid

    Interior Painting Mistakes to Avoid

    A bad paint job is almost never about the paint itself — it’s usually about the prep work and technique that happened before the roller ever touched the wall. I’ve watched enough DIY paint projects go sideways to know the same handful of interior painting mistakes show up again and again.

    Let’s go through what actually trips people up, so you can skip the frustration.

    What’s the Single Biggest Interior Painting Mistake?

    Quick answer: Skipping proper wall preparation — cleaning, sanding, and priming — is the single biggest interior painting mistake, since paint applied over dust, grease, or unprimed patches peels, cracks, or shows uneven texture within months.

    1. Skipping Surface Preparation

    Painting directly over a dirty or glossy wall without cleaning and light sanding leads to poor paint adhesion. It might look fine on day one, but peeling and cracking often follow within a few months.

    2. Not Using Painter’s Tape Properly

    Applying tape without pressing it down firmly along edges lets paint bleed underneath, resulting in messy, uneven lines. Press tape down firmly, and remove it while the paint is still slightly wet for the cleanest edges.

    3. Choosing the Wrong Finish for the Room

    Using flat matte finish in high-traffic areas like hallways or kids’ rooms means the paint scuffs and marks easily, and it’s genuinely hard to clean without damaging the finish. Washable emulsion or satin finish holds up far better in these spaces.

    4. Applying Paint Too Thick

    Quick answer: Applying paint too thick in a single coat causes drips, uneven texture, and significantly longer drying time — two thin, even coats almost always produce a better finish than one thick coat.

    I get why people do this — it feels like it should mean fewer coats needed. It genuinely doesn’t work that way with most emulsion paints.

    5. Ignoring Proper Drying Time Between Coats

    Rushing the second coat before the first has properly dried leads to uneven colour, visible roller marks, and sometimes peeling later. Most paints need 4-6 hours minimum between coats, longer in humid conditions.

    6. Not Priming Over Stains or Dark Colours

    Painting a light colour directly over a dark wall or a stained patch without primer usually requires far more coats than expected, and the stain can still bleed through over time. A stain-blocking primer solves this in one step.

    7. Poor Ventilation While Painting

    Painting in a closed room without airflow extends drying time significantly and traps fumes, which isn’t great for health either. Keep windows open and use a fan if possible, especially in monsoon humidity.

    8. Using Cheap Brushes and Rollers

    Low-quality rollers shed fibres into the wet paint, and cheap brushes leave visible bristle marks. Spending a bit more on decent tools genuinely makes a visible difference in the final finish.

    A Simple Pre-Paint Checklist

    1. Clean walls thoroughly, removing dust and grease
    2. Fill cracks and holes, sand smooth once dry
    3. Apply primer, especially over dark colours or stains
    4. Tape edges firmly and cleanly
    5. Apply paint in thin, even coats with proper drying time between

    Timing Mistakes to Avoid

    Painting during peak monsoon humidity extends drying time significantly and can affect finish quality. If possible, plan interior painting for drier months, or ensure good ventilation and dehumidification if painting during monsoon is unavoidable.

    FAQs

    Q: Why does my paint look patchy even after two coats? Usually insufficient drying time between coats, or skipping primer over a stained or previously dark-coloured wall.

    Q: How long should I wait between coats of paint? Typically 4-6 hours for most emulsion paints, though humid conditions can extend this significantly.

    Q: Is primer really necessary for every paint job? Not always, but it’s essential over dark colours, stains, or bare unpainted surfaces to ensure proper adhesion and true colour representation.

    Q: What finish should I use for a kitchen or high-traffic hallway? Satin or washable emulsion finish, since it withstands cleaning and scuffing far better than flat matte finish.

    Q: Can I paint over old peeling paint without removing it first? No, peeling paint should be scraped and sanded first, or the new paint will likely peel along with the old layer underneath.

    Conclusion

    Most interior painting mistakes come down to rushing the preparation stage or skipping steps that don’t seem important until the paint has dried and the flaws are obvious. Take the extra time on prep, use decent tools, and don’t rush between coats — the difference in the final result is genuinely significant. [link to related guide on paint colors for small rooms here]

    Alt text suggestions:

    1. “Properly taped wall edges before interior painting”
    2. “Applying primer over a dark wall before repainting”
    3. “Two thin even coats of paint being rolled onto a wall”
  • How to Choose the Right Paint Colors for Small Rooms

    How to Choose the Right Paint Colors for Small Rooms

    Small rooms get a bad reputation, but honestly, most of the time it’s the paint colour making them feel cramped, not the actual square footage. I’ve seen a genuinely tiny bedroom feel almost spacious just from a smart colour change — no furniture moved, nothing structural.

    Picking the right paint colors for small rooms is less about following strict rules and more about understanding a few things light and colour actually do in a confined space.

    Does Paint Color Really Change How Big a Room Feels?

    Quick answer: Yes — lighter, cooler paint colors reflect more light and visually push walls outward, making small rooms feel noticeably more spacious, while dark, warm tones tend to make walls feel closer and the room smaller.

    1. Light Neutrals Are the Safe, Effective Choice

    Soft whites, warm greys, and light beige tones reflect natural light well and don’t visually shrink a room. They’re not the most exciting choice, but they’re reliably effective for small spaces.

    2. Don’t Be Afraid of Cool Tones

    Light blues and soft sage greens have a genuinely spacious, airy quality in small rooms — often more so than plain white, which can sometimes feel a bit sterile or flat depending on lighting.

    3. Monochromatic Schemes Trick the Eye

    Painting walls, trim, and even ceiling in slightly varying shades of the same colour family removes the visual “stopping points” that make a room feel boxed in, creating a smoother, more expansive feel.

    Quick answer: A monochromatic paint scheme — walls, trim, and ceiling in closely related shades — eliminates visual breaks between surfaces, making small rooms feel more continuous and spacious than high-contrast colour combinations.

    4. Consider the Room’s Natural Light

    A north-facing room with limited natural light handles warmer light tones better, since it needs the visual warmth. A well-lit south-facing room has more flexibility to go cooler or even slightly darker without feeling gloomy.

    5. Accent Walls — Yes or No for Small Rooms?

    This is genuinely debatable, and I’ll admit I have mixed feelings. A single accent wall in a deeper tone can add character without overwhelming a small space, but two or more accent walls in a tiny room usually backfires and feels chaotic.

    6. Ceiling Color Matters More Than People Think

    Painting the ceiling the same colour as the walls, or even a shade lighter, removes the visual “lid” effect that a stark white ceiling against coloured walls can sometimes create in small rooms.

    7. Glossy vs Matte Finish

    Semi-gloss finishes reflect more light than matte, which can help a small room feel brighter — though they also show wall imperfections more clearly, so surface prep matters more with this choice.

    Colours That Tend to Work Well

    • Soft sage green
    • Warm greige (grey-beige blend)
    • Pale sky blue
    • Soft blush or dusty pink for bedrooms specifically

    Colours to Approach Carefully

    1. Very dark navy or charcoal — striking but genuinely shrinks perceived space significantly
    2. Bright, saturated colours across all walls — visually overwhelming in confined spaces
    3. Stark, cool white without warmth — can feel clinical rather than cozy

    Testing Before Committing

    Always test a colour on the actual wall in your room’s specific lighting before committing to a full repaint. Paint samples look noticeably different under artificial light versus natural daylight, and small rooms amplify this difference.

    FAQs

    Q: What’s the best paint color for a small bedroom? Soft, warm neutrals or pale blues generally work well, creating a calm, spacious feel without being visually stark.

    Q: Should small rooms always be painted white? Not necessarily — light, cool tones like sage or soft blue can feel just as spacious while adding more personality than plain white.

    Q: Does a dark accent wall shrink a small room? It can, though a single accent wall in an otherwise light room usually adds depth without significant negative impact on perceived space.

    Q: Should the ceiling be a different color than the walls in a small room? Matching or closely related ceiling and wall colours generally make a small room feel taller and more open than a contrasting white ceiling.

    Q: Does paint finish (matte vs glossy) affect how big a room feels? Yes — semi-gloss finishes reflect more light and can make a small room feel slightly brighter and more open.

    Conclusion

    Choosing the right paint colors for small rooms comes down to understanding light, contrast, and a bit of trial and error with actual samples on your wall. Light neutrals and cool tones are reliable starting points, but don’t be afraid to test something with a bit more character — a well-chosen colour can genuinely transform how spacious a small room feels. [link to related guide on interior painting mistakes here]

    Alt text suggestions:

    1. “Small bedroom painted in soft sage green making space feel larger”
    2. “Monochromatic paint scheme with matching wall and ceiling color”
    3. “Paint color samples being tested on a small room wall”
  • Vinyl vs Laminate Flooring: Full Comparison

    Vinyl vs Laminate Flooring: Full Comparison

    Standing in a flooring showroom staring at sample after sample, most people can barely tell the difference between vinyl and laminate at a glance. But once you actually live on either for a few years, the differences become pretty obvious.

    This vinyl vs laminate flooring comparison breaks down what genuinely matters when you’re deciding between the two for your home in 2026.

    The Core Difference Between Vinyl and Laminate

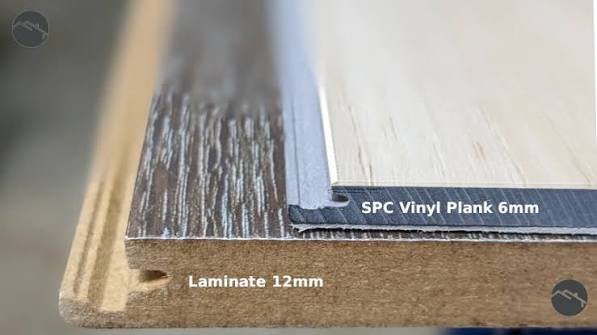
    Quick answer: Vinyl flooring is fully synthetic and water-resistant throughout, while laminate flooring has a fiberboard core that swells if exposed to standing water — making vinyl the better choice for kitchens, bathrooms, and homes with kids or pets.

    1. Water Resistance

    This is genuinely the biggest deciding factor for most Indian homes. Vinyl handles spills, humidity, and even standing water reasonably well. Laminate’s core material swells and warps if moisture seeps in, making it a poor choice for bathrooms or flood-prone areas.

    2. Cost Comparison

    • Vinyl: ₹80-₹200 per sq ft for good quality LVT
    • Laminate: ₹60-₹150 per sq ft depending on thickness and finish

    Laminate is often slightly cheaper upfront, though this gap has narrowed in 2026 as vinyl manufacturing has become more efficient.

    3. Durability and Lifespan

    Quick answer: Vinyl flooring typically lasts 15-25 years with proper care, while laminate flooring generally lasts 15-20 years but is more vulnerable to moisture-related damage that can shorten this significantly in humid climates.

    4. Comfort Underfoot

    Vinyl tends to feel slightly softer and warmer underfoot, especially cushioned vinyl varieties, compared to laminate’s harder, sometimes colder feel — a genuine consideration for homes with young children who spend time on the floor.

    5. Installation Differences

    Both are relatively DIY-friendly with click-lock installation systems, though vinyl planks are generally a bit more forgiving of subfloor imperfections than laminate.

    6. Appearance and Design Options

    Laminate has traditionally offered more realistic wood-grain texture and appearance, though vinyl has closed this gap significantly with modern printing and texturing technology available in 2026.

    7. Sound and Noise

    Laminate tends to sound slightly hollow underfoot unless installed with proper underlayment. Vinyl, particularly thicker LVT, generally absorbs sound better and feels more solid when walked on.

    8. Suitability by Room

    1. Kitchen and bathroom — vinyl is the clear winner due to water resistance
    2. Bedrooms — either works well, laminate slightly cheaper
    3. Living room — both suitable, choose based on budget and aesthetic preference
    4. Basements or ground floors prone to dampness — vinyl strongly recommended

    Quick answer: For kitchens and bathrooms specifically, vinyl flooring is strongly recommended over laminate due to its full water resistance, while laminate remains a reasonable, budget-friendly choice for drier areas like bedrooms.

    Environmental Considerations

    Neither option is particularly eco-friendly compared to natural materials, though some vinyl and laminate manufacturers now offer recycled-content options worth asking about if sustainability matters to your decision.

    Making the Final Decision

    If your home deals with humidity, has kids or pets, or you’re flooring a kitchen or bathroom — vinyl is generally the smarter long-term investment despite the slightly higher upfront cost. If budget is tight and you’re flooring dry areas like bedrooms, laminate remains a solid, cost-effective choice.

    FAQs

    Q: Which is more water-resistant, vinyl or laminate flooring? Vinyl, by a significant margin — it’s suitable for bathrooms and kitchens, while laminate should generally be avoided in consistently wet areas.

    Q: Is laminate flooring cheaper than vinyl? Slightly, on average, though the price gap has narrowed considerably with modern manufacturing improvements.

    Q: Which lasts longer, vinyl or laminate flooring? Vinyl typically has a longer practical lifespan, especially in humid conditions, due to its superior water resistance.

    Q: Can I install vinyl or laminate flooring myself? Yes, both offer click-lock installation systems suitable for DIY installation, though vinyl is slightly more forgiving of subfloor imperfections.

    Q: Which flooring feels warmer underfoot, vinyl or laminate? Vinyl generally feels warmer and softer, particularly cushioned varieties, compared to laminate’s harder surface.

    Conclusion

    Choosing between vinyl vs laminate flooring really comes down to where you’re installing it and your budget priorities. For moisture-prone areas and homes with kids or pets, vinyl’s water resistance makes it worth the slightly higher cost. For dry areas on a tighter budget, laminate remains a genuinely solid choice. [link to related guide on best flooring for pet owners here]

    Alt text suggestions:

    1. “Vinyl plank flooring installation in a modern kitchen”
    2. “Laminate flooring with realistic wood-grain texture in bedroom”
    3. “Close-up comparison of vinyl and laminate flooring samples”
  • Best Flooring Options for Pet Owners

    Best Flooring Options for Pet Owners

    If you’ve ever come home to find claw marks across your beautiful new flooring, you already know regular flooring choices don’t always survive contact with an excited dog or a curious cat. I learned this after watching a friend’s newly installed laminate get scratched up within weeks of bringing home a puppy.

    Finding the best flooring for pet owners means balancing durability, comfort, and honestly, your own sanity when it comes to cleanup.

    What Should Pet Owners Prioritise in Flooring?

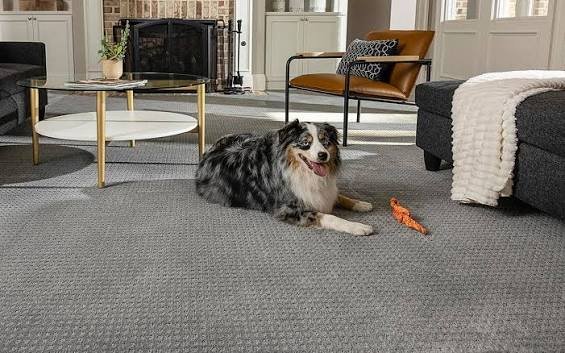
    Quick answer: The best flooring for pet owners combines scratch resistance, water resistance for accidents, and enough traction to prevent slipping — vinyl and tile generally outperform hardwood and laminate on all three counts.

    1. Vinyl Flooring

    Vinyl, particularly luxury vinyl tile (LVT), handles pet life remarkably well. It’s water-resistant, reasonably scratch-resistant, and comfortable enough underfoot for pets to walk and lie on comfortably.

    • Water-resistant, handling accidents without warping
    • Available in wood-look designs without hardwood’s vulnerability
    • Costs ₹80-₹200 per sq ft depending on quality

    2. Tile Flooring

    Tile is genuinely one of the most durable options against scratches and stains, though it can feel cold and slippery for pets, especially older animals with joint issues.

    Quick answer: Tile flooring resists scratches and stains exceptionally well but can be slippery for pets, particularly larger dogs or senior animals — adding textured or matte-finish tiles reduces this risk significantly.

    3. Engineered Hardwood (With Caveats)

    Solid hardwood scratches easily and isn’t ideal for pet households. Engineered hardwood with a harder wear layer holds up somewhat better, but honestly, it’s still not the top choice if you have an active, larger dog.

    4. Laminate Flooring — Good, Not Great

    Modern laminate with a scratch-resistant wear layer performs reasonably well, though it’s less water-resistant than vinyl and can warp if accidents aren’t cleaned up quickly.

    5. What to Avoid

    • Carpet — traps pet hair, odours, and stains persistently
    • Soft, unsealed natural stone — scratches and stains easily
    • Glossy tile without texture — genuinely dangerous slip risk for pets

    Comfort Matters Too, Not Just Durability

    Pets, especially older ones, benefit from some cushioning and grip. Adding textured rugs with non-slip backing on top of hard flooring gives them comfortable resting spots without sacrificing the durability of the main flooring.

    Cleaning and Maintenance Considerations

    1. Vinyl and tile: easy to mop, resist most stains
    2. Laminate: needs quick cleanup of spills to prevent swelling
    3. Hardwood: requires more careful, frequent maintenance around pets

    Cost Comparison for a Mid-Sized Home

    For roughly 1000 sq ft of flooring:

    • Vinyl: ₹80,000-₹2,00,000
    • Tile: ₹60,000-₹1,80,000
    • Engineered hardwood: ₹1,50,000-₹3,50,000
    • Laminate: ₹70,000-₹1,50,000

    Balancing Pet-Friendliness With Aesthetic Goals

    Quick answer: Luxury vinyl tile currently offers the best balance of pet-friendly durability and aesthetic flexibility, since it convincingly mimics hardwood or stone visuals while handling scratches and moisture far better than the real materials.

    FAQs

    Q: What’s the most scratch-resistant flooring for dogs? Tile and vinyl generally resist scratches best, significantly outperforming hardwood and standard laminate.

    Q: Is vinyl flooring safe for pets to walk on? Yes, it’s water-resistant, provides decent traction, and is comfortable enough for pets to lie on directly.

    Q: Can hardwood flooring work for pet owners at all? Engineered hardwood with a hardened wear layer performs better than solid hardwood, though it’s still more vulnerable than vinyl or tile.

    Q: Does flooring choice affect pet odour control? Yes significantly — hard, non-porous flooring like vinyl and tile traps far less odour than carpet, which absorbs and retains smells.

    Q: Is tile flooring dangerous for older or larger pets? It can be slippery; choosing textured or matte-finish tile largely mitigates this risk while keeping durability benefits.

    Conclusion

    Choosing the best flooring for pet owners means prioritising durability and easy cleanup over pure aesthetics, though thankfully modern vinyl options don’t force you to sacrifice looks for practicality anymore. If you’re renovating with pets in mind, luxury vinyl tile is genuinely hard to beat for the combination of resilience and design flexibility. [link to related guide on vinyl vs laminate flooring here]

    Alt text suggestions:

    1. “Luxury vinyl tile flooring in a pet-friendly living room”
    2. “Textured matte-finish tile flooring for slip resistance”
    3. “Dog resting comfortably on durable vinyl flooring”
  • Metal Roof vs Shingle Roof: Which Is Better

    Metal Roof vs Shingle Roof: Which Is Better

    Choosing roofing material feels like a bigger decision than it should be, mostly because the options all sound similarly convincing in sales pitches. I’ve gone through this comparison with a couple of homeowners building independent houses, and the honest answer is — it depends heavily on your climate and budget, not just personal preference.

    Let’s break down metal roof vs shingle roof properly, without the sales spin.

    Quick Comparison Overview

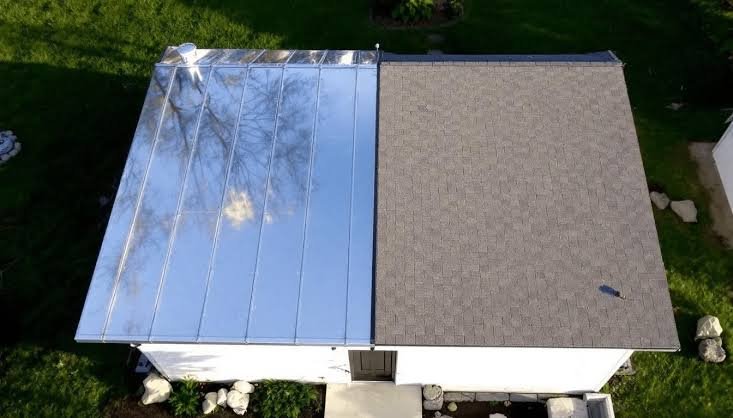
    Quick answer: Metal roofing generally outperforms shingle roofing in durability and lifespan (40-70 years vs 20-30 years) and handles heavy monsoon rain better, while shingle roofing tends to cost less upfront and offers more aesthetic variety for sloped residential designs.

    1. Upfront Cost Comparison

    Metal roofing typically costs more initially — roughly ₹150-₹350 per sq ft depending on the metal type and gauge — compared to shingle roofing at around ₹100-₹200 per sq ft. The gap has narrowed somewhat in 2026 as metal roofing material costs have become more competitive.

    2. Lifespan and Durability

    • Metal roofs: 40-70 years depending on material quality and maintenance
    • Shingle roofs: typically 20-30 years before requiring replacement
    • Metal handles heavy monsoon rainfall and wind better in most cases

    3. Maintenance Requirements

    Quick answer: Metal roofs generally need less frequent maintenance than shingle roofs, mainly requiring occasional rust-prevention coating, while shingle roofs need more regular inspection for cracked or missing shingles, especially after storms.

    4. Performance in Indian Climate Conditions

    For regions with heavy monsoon rainfall, metal roofing’s steep drainage and durability against water pooling give it a genuine edge. In drier, hotter regions, shingle roofing with proper insulation can perform comparably well while costing less.

    5. Noise During Rain

    This is a real concern people raise about metal roofs — rain does sound louder on metal without proper insulation. Adding a sound-dampening underlayment largely solves this, though it does add to the overall cost.

    6. Heat Reflection and Energy Efficiency

    Modern coated metal roofing reflects significant solar heat, which can meaningfully reduce indoor cooling costs during Indian summers. Shingle roofing, particularly darker colours, tends to absorb more heat unless specifically designed with reflective coating.

    7. Aesthetic and Design Flexibility

    Shingle roofing offers more variety in colour, texture, and traditional aesthetic appeal, which matters for certain architectural styles. Metal roofing has expanded its design options too, but shingles still lead here for homeowners wanting a classic look.

    8. Environmental Considerations

    Metal roofing is more recyclable at end-of-life and often incorporates recycled content already, making it the more sustainable choice if that factors into your decision.

    Which Should You Choose?

    Quick answer: Choose metal roofing if you’re building for the long term and live in a high-rainfall region willing to pay more upfront for lower lifetime maintenance; choose shingle roofing if upfront budget is the priority and you prefer traditional aesthetic flexibility.

    A Simple Decision Framework

    1. Budget-conscious, shorter-term ownership plan — shingle roofing
    2. Long-term ownership, heavy monsoon region — metal roofing
    3. Priority on cooling cost reduction — metal roofing with reflective coating
    4. Priority on traditional aesthetic — shingle roofing

    FAQs

    Q: Is metal roofing more expensive than shingle roofing overall? Upfront yes, but factoring in the significantly longer lifespan, metal roofing often costs less per year of use over its lifetime.

    Q: Does metal roofing really make rain louder inside the house? It can without proper insulation, but adding an underlayment largely eliminates this concern.

    Q: Which roofing type handles Indian monsoons better? Metal roofing generally performs better under heavy, sustained rainfall due to its steep drainage and water resistance.

    Q: Do shingle roofs need more frequent repairs than metal roofs? Yes, generally — shingles are more prone to wind and storm damage requiring periodic inspection and repair.

    Q: Is metal roofing worth it for a hot climate? Yes, especially with reflective coating, since it can meaningfully reduce indoor heat gain and cooling costs.

    Conclusion

    There’s no universal winner in the metal roof vs shingle roof debate — it genuinely comes down to your budget, climate, and how long you plan to own the property. For long-term durability in heavy rain regions, metal tends to win; for upfront affordability and traditional aesthetics, shingle still holds its ground. [link to related guide on signs you need roof replacement here]

    Alt text suggestions:

    1. “Metal roof installation on residential home showing steep drainage”
    2. “Traditional shingle roof with classic architectural design”
    3. “Comparison of metal and shingle roofing materials side by side”